Presets and Defaults in Lightroom
Presets and Defaults are two mechanisms Lightroom provides that can lead to an increase in efficiency. They each provide a similar functionality by allowing you to save develop settings but do so in a very different ways.
Differences Between Presets and Defaults
Defaults and presets do similar things, that is, apply basic development settings to an image. However, the similarity stops there.
Defaults are the settings Lightroom applies automatically to every file on import or when you reset it. They change every development setting except white balance. Further, development defaults always apply to a specific camera model. However, they can be made more specific beyond that.
Presets are saved settings that can be applied at any time in develop (or even form the library module) as well as at import. They differ from defaults in a number of ways. First, they can be applied to any file on import regardless of the camera or settings it was created with. In addition, the settings they change can be limited so they can be used for creative effects.
When to Use Each
Like most things, there is no absolute rule about how presets and defaults should be used. However, they do things differently and that makes them more or less suitable for different tasks.
Defaults have the advantage of being specific to a camera or ISO setting. Because of that they can be used to apply specific levels of noise reduction and sharpening to different cameras or at different ISOs.
Presets on the other hand can be applied to any image; either as its being imported or later on. While they can certainly be used to set and reset baseline settings they can’t be tied to the “Reset” button in develop. Presets are best used to provide artistic effects or a consistent feel to images during processing.
In practice, I use defaults to set sharpening and noise reduction only and presets to apply more commonly used creative effects.
Creating Presets
Presets are created in the Development Module by left clicking the plus icon on the preset pallet. When you do so you’re presented with a dialog box that asks you for several pieces of information:
- A name – this should be something that makes sense based on what the preset does (i.e. old B&W photo for a preset that simulates and old photo)
- A folder – this is how Lightroom organizes the presets in the preset pallet.
- What settings to save
When you’re done, click Create to save the preset and add it to the Presets panel in the Develop Module as well as the Develop Settings context menu in the Library Module.
Updating Presets
After you’ve created a preset, you can change the settings the preset applies by updating the preset.
You do this by right clicking on the name of the preset you want to update in the preset panel and selecting Update Preset from the context menu. Again, you will be promoted with a dialog box asking you which settings you want the preset to apply.
Applying Presets
Presets can be applied in a number of ways, the three most common are:
- Presets Panel in Develop
- Development Settings context menu in Library
- At import
The first two methods are straightforward; clicking on a preset will apply the preset to the currently selected image.
Applying a preset on import, can be a useful feature, however, there are a few gotchas with respect to the import dialog. This is especially the case if you’re trying to setup the preset ahead of time.
- Settings changed in the Import dialog box are saved between imports. That means, if you set a preset to do a fancy effect on one import, it will remain set on the next import too.
- The Import dialog only saves the settings if you close it by clicking Import. This means if you open it, make some changes, then click cancel to leave the box the change won’t be saved.
Applying Presets on Import
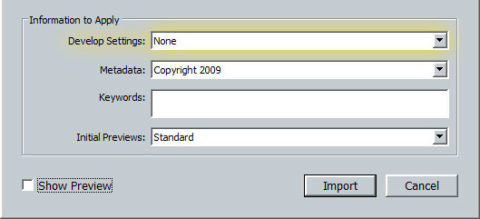
To apply a preset on import at the time you’re importing images:
- Open the Import dialog
- Change the Development Settings field in the Information to Apply section
- Import the images by clicking import. Easy as pie.

However, if you’re trying to set or unset a preset with out importing any images you have a few more hoops to jump though.
First is getting the import dialog to open.
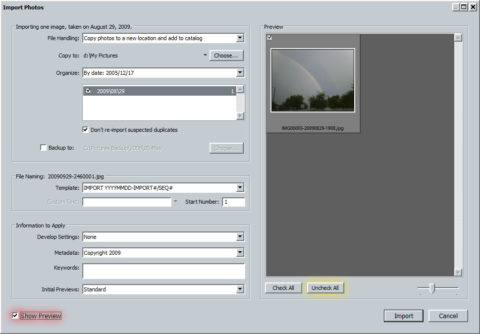
Lightroom requires you to feed it images to get to the import dialog. The easiest way to do this is to stick a flash card in the computer with some images on it. Alternatively, you can open a single image from somewhere on your computer using Import Photos from Disk.
Once the Import dialog box is open:
- Make sure the Show Preview check box is checked (highlighted in red)
- Click the Uncheck All button (highlighted in yellow)
- Change the Develop Settings and click Import.
This will save the develop setting and not import any extra pictures you’ll have to delete.

Comments
There are no comments on this article yet. Why don't you start the discussion?