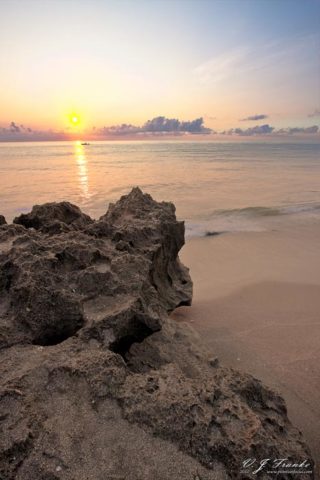
Behind Blowing Rocks HDR
I’m not a huge fan of HDR images; most of the time they look obviously over processed though when they’re well executed and the processing is understated they come off very nicely. I think the trick to good HDRs is to use the larger capture range simply as a mechanism to get enough data to put together a lower noise image with slightly better shadow detail. Perhaps I’m just a traditionalist, but I think it’s best to think of HDRs as split ND filters without be forced to have a straight line for the split.
Camera Setup
 A while back, I wrote an article on the way I setup my camera when shooting HDRs and multiple exposure images.
Sizing your brackets is something of a question. Some reputable sources suggest the bracket size (i.e. how many stops between exposures) depends on the camera. That’s probably the ideal solution. That said, I’ve never seen a difference between 1 stop and 2 stops on my 40D, so I don’t use that. When I’m shooting HDRs, I set the bracket size based on how much I need to go under to get the brightest highlight detail I back. In other words, if I think I need to shoot 2 stops under to keep the sky from completely blowing, I use a 2 EV bracket. Remember, I want dark things to be dark in the final image, just not black, so massively overexposing them isn’t helpful to me.
With respect to focus, one thing is important; focus must not change between exposures. Where to focus is another problem, even with a lot of depth of field choosing whether to focusing at infinity, the hyperfocal point and even on a subject are complex enough to warrant an article on their own. Even when I have lots of depth of field, I still tend to focus on the most important subject.
Processing
For me all processing starts with importing into Lightroom. For HDRs, I don’t do any processing to them beyond the import defaults. From there, it’s off to Photoshop.
Photoshop is what I use to do HDRs; I don’t really do enough to justify buying special purpose software for it. If you’re coming from Lightroom via the merge to HDR edit in option, you should be at the Merge to HDR window, if not, you’ll want to load your images and merge them to HDR. I do this in 32-bit mode and then do the HDR tone mapping by switching the image to 16-bit (or 8-bit) color as a separate step. This gives me an opportunity to set an undo point if I need to go back and fix something in the tone-mapping step.
In the case of this image, the tone mapping was done using the Local Adaption method. After that’s done, it’s just a matter of tweaking the image to get the desired look.
For this, I created a selection of the top half of the image, and feathered it by about 100 pixels. This has the effect of creating a graduated split filter, but in mask form, so I can do just about anything I want in the two halves.
To the top-half of the image, I applied a curves adjustment that darkened the mid-tones and darks to bring out some cloud detail. To the bottom-half of the image, I applied a curves layer to slightly brighten the mid-tones and darks and a warming photo filter to make the rocks less blue.
While I may have been able to do these adjustments when doing the HDR tone mapping, I find that this gives me a bit more control. In addition, in my experience, you just have to play with the adjustments; there are no set rules for what to do.
In the right circumstances an HDR can be the best solution to dealing with huge dynamic range scenes especially when there is an irregular border between the brightest and darkest areas rendering traditional split neutral density filters useless.
