Keywording In Lightroom

Though this post is specifically about Lightroom, at least in so far as the details on how to do something are Lightroom specific, much, if not all, of the overall thought process and intent can be applied to any similar software.
Before going any farther, I want to spend a moment talking about the point of keywording. Keywording exists for you and potentially for your clients, to find things. I think it’s important to remember because the entire point of what keywords you create, how you organize them is entirely up to you, and even whether you want to use them at all is entirely up to you.
For example, on one hand I use a number of keywords calling out major items in the photo, the type or style of photo, even predominate colors if I think it’s worthwhile for that image. My keyword list in Lightroom is hierarchal, meaning applying one keyword to an image can in turn implicitly imply man more. I also make use of synonym keywords that Lightroom provides. In my workflow, I use keywords to find pictures, narrowing my entire archive to a couple dozen or hundred pictures in a single click.
On the other hand, I know photographers who barely use keywords at all, and when they do, they do so very selectively.
You can do anything from either extreme or something in the middle, the point is to use what you find more intelligent and useful not necessarily some system that someone else says to use.
Choosing Good Keywords
I think the best place to start any discussion about keywording is with a discussion about what to use for the keywords in the first place. If there’s one truth I’ve learned from trying to re-architect a keyword library after realizing that it wasn’t thought through from the start, it’s that organizing your keywords well from the start is a lot easier than trying to reorganize them later.
So what makes good keywords? Moreover, how do you organize them?
For our purposes, a keyword is a noun, verb, or adjective that generally describes the content, behavior, style or some other key factor of an image. It can be anything you want to describe the subject matter, what it’s doing, the style, feeling, mood, or anything else that’s relevant to you about an image.
One of my first considerations is that a good keyword is also reusable. That is, I won’t apply it to 5 pictures in one folder and nothing else. You could say keywords should be generic, but that doesn’t necessarily have to be the case.
For example, if you’re an Orca researcher you very well should have a keyword for every individual you frequently photograph. On the other hand, if you’re a landscape photographer who’s photographed some Killer Whales at some point, that level of specificity isn’t necessary or necessarily desirable. Likewise, a portrait photographer who works repeated with the same models would find that the models’ names would be good keywords, even though for a photojournalist it would likely lead to a useless ballooning of their keyword list to do the same.
That’s not to say you shouldn’t note information like the model’s name, or the species of bird, along with the image. However, you would probably find it better to store infrequently referenced or unique information in one of the other metadata fields, like the caption, location, scene, etc. fields. Also keep in mind that geographical location information can be stored as GPS coordinates (even if you have to approximate it later) which in turn can be used to plot and search against a map instead of through text fields.
- animals
- cats
- lion
- leopard
- …
Figure 1: Example flat keyword list.
In Figure 1, I’ve show an example of part of a keyword list I might have after returning from a photo safari in Africa. For some photographers there might be fewer keywords, for example just Lion and Leopard, for others they might go for more.
I chose these keywords for a couple of reasons. The last two are species specific, but still general enough. I can assume I have multiple lion and leopard images, so if I search on say lion I get all the pictures of lions I took.
Moving a logical step up the ladder, I have another logical group for cats. In my thinking if I’m looking for pictures specific to just the big cats, as opposed to the pictures of elephants, I can search for “cats” and get all the images of both lions and leopards.
Finally, I have an even higher logical category, “animals”. This is there to separate animal images from say landscapes, or portraits. With everything properly tagged, searching for animals would show me all of the animal pictures, be they lions, leopards, or elephants.
Orginizing Keywords
Now that you’ve started keywording images with relevant information, it’s time to figure out how to organize your keywords into something easily managed and navigated.
The Flat Keyword List
By default, Lightroom places your keywords in a flat list. A flat list is simplistic and works well enough for small numbers of keywords, but can become hard to manage, and hard to find things in with large numbers of keywords. Flat keyword lists also mean that you have to add all the relevant keywords to the image manually.
- animals
- cats
- lion
- leopard
- …
Figure 2: In a flat keywording system there is no relationship between keywords.
Figure 2 shows an example of a flat keyword list. In this arrangement, there is no implied application of keywords. If you want to be able to search for cats and see lions and leopards you must remember to tag those pictures with cats when you’re keywording them.
On the other hand, it’s probably already becoming clear that flat lists have limitations. If you forget to tag an image with one of the logical groups it should belong to (i.e. cats for lions), then your images fail to appear in a search for that keyword.
Fortunately, Lightroom provides us with a solution to that problem, a hierarchal keyword list.
Hierarchical Keyword Lists
Hierarchical keyword lists impose a level of logical grouping between categories. The relationship is best thought of as a tree, where a keyword can have zero or more children, and each of the children can have 0 or more children of their own.
- animals
- cats
- lion
- leopard
- cats
Figure 3: In a hierarchical keywording system, keywords can be grouped logically. For example, lion is a a member of cats and animals..
The advantage of these kinds of keywording schemes is that assigning a child keyword implies the assignment of its parent keywords. For example, with the hierarchical list shown in Figure 3, if you apply the keyword “lion” to an image, the image will also appear to have the keywords cats and animals assigned as well.
For example, say you have a keyword hierarchy setup as shown above. When the keyword lion is applied to an image, Lightroom also recognizes that the image should also have the keywords “cats” and “animals” applied as well.
The advantage of this is obvious; it becomes much easier and straightforward to apply rich descriptive sets of keywords without having to remember to type every single one. Besides, the obvious improvements in the speed you can keyword things, it also helps make things more consistent. A picture of a lion only need be tagged lion, remembering if it also should have “cats” or “cat” or “big cat” becomes something the software takes care of.
I would point out that in Lightroom the user interface only shows that have been directly assigned by default. The images will still show up in a search for parent, or implied, keywords, and those keywords will be written to the image when it’s exported as if they were set manually. If you want to see all the keywords that apply to an image, you need to change the keywording tags dropdown to either, “Keywords and Containing keywords” or, “Will export”.
Creating Logical Hierarchies
The one problem that a hierarchical keywording system poses is creating the logical hierarchy. Again, it’s important to understand that there is no right and wrong way to go about doing this and a lot of how things are organized depends on the person doing the organization. Remember, this is an aid for you to find pictures, nothing more.
Figure 4: Species and sex have been combined together, this may work well when there are separate words for the male and female and they are commonly referred to that way. |
Figure 5: Species and sex have been separated. This works well when the sex is hard to establish, isn’t generally important, or there aren’t separate words for the male and female of the species. |
Above are two examples of how one might organize keywords relating to a certain African big cat. The list shown in Figure 4 mixes species and sex. I.e. the keyword lion specifically refers to a male “lion” and the keyword “lioness” refers to a female lion.
The list in Figure 5 shows what I would argue is a better approach. Using the principal of making keywords as broadly applicable as possible, I’ve separated the sex and species information. By doing so, I’ve made both keywords more broadly applicable, as lion now applies to any lion, and female now applies to any female regardless of species.
There are pros and cons to each way, and these aren’t the only possible options. What I would recommend is developing a strategy that is somewhat consistent and suits your work best. If your primary focus is, say, African wildlife and you expect people to search for images of female lions by searching for “lioness” then the first system would likely be more effective both for entry and for generating search hits. Conversely, if the bulk of your work revolved around species that generally are difficult to differentiate visually, the sex isn’t important or there isn’t a separate word for the male and females, the second solution may work better.
One way of thinking about your keywords is thinking about how you’d search for a specific image using them. Using the strategy shown in Figure 2, searching for “lion” won’t return any results of female lions at all, and searching for all lion pictures requires search for both terms, literally “lion lioness” in the search box.
In the strategy shown in Figure 3, searching for pictures of only male or female lions requires a more complicated search, either “lion female,” or, “lion male”. However, searching for all lion pictures only requires searching for “lion”.
Yet another option would be to combine the two strategies. This can be necessary if you must tag some sub-group separately to insure people can find the images, but still want to retain a higher order system.
- animals
- cats
- lion
- lioness
- lion
- cats
- gender
- male
- female
Figure 6: a hybrid of the strategies show in figure 4 and figure 5.
One major down side of such a system is that searching only for male lions would require filtering out images with the lioness keyword. In Lightroom, this means prefixing the term you want not to be included with an exclamation point (!). So the search for male lions only would be either “lion !lioness” or “lion male” with this organization.
Personally, I prefer the strategy outlined in Figure 5, but there’s no denying that it might have search implications if you’re using your keywords on exported images to ultimately drive searches and sales.
Creating Keywords
So far, most of this has been a thought exercise in what makes good keywords and how to organize them. Now the question is how do you get hose keywords into Lightroom?
The Keywording Panel
The most basic and straightforward way of entering keywords is to type them directly into the keywording box on the right panel.
Entering keywords though the keywording panel actually has two effects, first, and primarily it applies keywords to images. Secondly, it will create keywords if they don’t already exist in Lightroom’s Keyword library. In other words, if you just want to create keywords, as opposed to creating and applying them to an image at the same time, this isn’t the way to go.
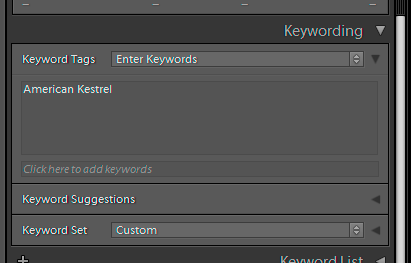
There are actually two ways to enter keywords in the keywording panel. First, if the “Keyword Tags” drop down is set to “Enter Keywords” then you can type the keywords directly into the large textbox directly below it. Secondly, regardless of what the “Keyword Tags” drop down is set to, keywords can always be added by typing them into the line that reads, “Click here to add keywords”.
One consideration to remember is that you can remove keywords by deleting them from the larger text area, but you can’t remove already added keywords though the “Click here” line.
The Keyword List and Create Keyword Dialog
While the keywording panel and the create and apply as you got methodology is probably the fastest way to get keywords into Lightroom and onto your images, it’s not the primary interface for creating Lightroom Keywords, that’s reserved for the Keyword List and Create Keywords Dialog.
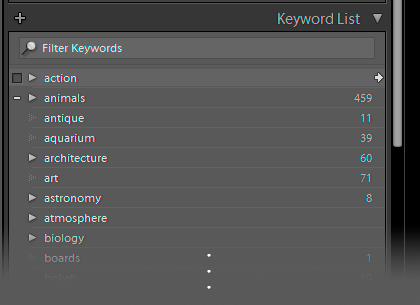
The Keyword List is Lightroom’s primary means for organizing keywords, though it provides a number of functions in addition to that. Keywords can be reorganized by dragging and dropping keywords on the list, dropping a keyword on another creates a parent/child relationship grouping the dropped keyword under the one it was dropped on. The numbers on the right side indicate the number of images that have had a given keyword applied, and the small right arrow next to them will show you those images in the grid or loupe view.
The status of a keyword as applied to a photo is shown in the very first column on the left side. A check mark (not shown) indicates the keyword has been directly applied to the image. A line or bar (-) in that column means that one of the child keywords have been applied directly, by the hierarchical relationship the keyword next to the line is applied as well. Finally, you can apply and remove keywords, by checking or unchecking the box that shows up in this column (see the “animal” line).
Clicking the small plus sign (+) on the left side of the title of the keyword list opens the Create Keyword Tag dialog. You can also bring up the Create Keyword Tag dialog by right clicking in the keyword list and choosing either “Create Keyword Tag”, or “Create Keyword Tag inside…” from the context menu. The second option is the most direct way to create hierarchies in the Keyword List panel.
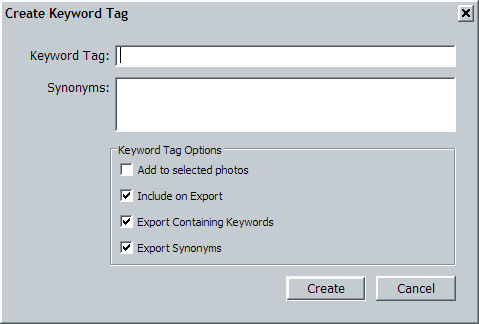
The Create Keyword Tag dialog exposes all the functionality Lightroom offers in creating keywords—though all of this can be done in other ways, which I’ll come back to in advanced usage of the keywording box in a moment.
As you might guess from the Keyword Tag dialog, Lightroom’s keywording system is a little more complicated than it seems at first glance. Keywords can have synonyms, which do show up in the searches. For example, my keyword “animals” has animal as a synonym, and searching for either returns the same set up images. In many cases, because I find them interesting, I include the scientific names of various animals as a synonym to their common names.
There are 3 primary Keyword Tag Options, first is Include on Export. Unchecking this and the keyword you create won’t be exported. At first glance this may seem useless, but it can be used to group other keywords in a way that makes logical sense but has no real bearing on export. For example, you might break a hierarchal keyword list into a half doezen or dozen top level keywords, say, “things”, “people”, “animals”, “styles”, etc. then place related keywords you want to export inside of those. This is mostly useful for cleaning up the navigation and organization of the keyword list, as long flat lists can get unwieldy.
The second option, Export containing keywords, works like “Export Keyword” but affects whether or not Lightroom will export all the parent keywords for the keyword it’s set or unset for. I can’t say I’ve ever found a use for this, but it can come in handy if you have a hierarchy that you want most things to include, but one or a limited number of keywords not to.
The third option is export synonyms. Disabling this will prevent Lightroom from exporting anything in the synonyms box for the keyword. This can be useful if you’ve created synonyms that are only plural or singular forms of the keyword itself so you can search on them, but are otherwise unnecessary to have on the exported image.
When creating keywords, there will be one final checkbox, “put inside” which will add the keyword you’re creating to the keyword that is listed on that line.
The big advantage of the Create Keyword Tag dialog over using the Keywording panel is control and not having to add keywords to images to create them. However, it’s not the best solution for creating a lot of keywords. For that you want to import keywords.
Importing Keywords
The final method of creating keywords in Lightroom isn’t actually done in Lightroom, but in an external editor and then imported.
Importing a keyword file saves a significant amount of time and allows for almost all of the options that can be set in the Edit Keyword Tag dialog to be set ahead of time. The two options that can’t be set directly are Export Containing Keywords and Export Synonyms. However, you can set specific keywords not to export as well as assigning synonyms to them.
The keyword file format is quite simple. Each keyword is entered on a single line, with tab indented lines denote that a keyword is a child of another. It’s very important, the indenting MUST be done using tabs not spaces, or Lightroom won’t interpret the file properly. Finally square brackets (‘[‘ and ‘]’) and braces (‘{‘ and ‘}’) can be used to change the meaning of a word. The easiest way to explain this is through an example.
- Animal
- {animals}
- Bird
- [North American]
- Red-Shouldered Hawk
- {Buteo lineatus}
- Red-Shouldered Hawk
- [Asian]
- Fairy bluebird
- [North American]
Figure 10: Sample Keyword File Excerpt
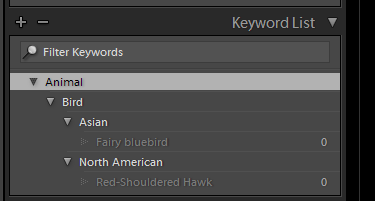
Figure 11 shows how the sample keyword list in Figure 10 was actually imported. The keywords Red-Shouldered Hawk and Fairy Bluebird are a lighter gray because they aren’t assigned to any images yet, nor do they have child keywords. The keywords in braces are made synonyms of the keyword that it’s a child of, as can be seen in Figure 12. Finely keywords surrounded in brackets are set not to export (Figure 13).
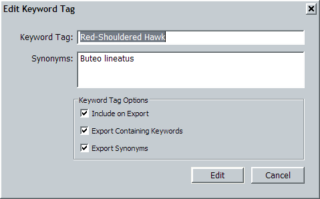 |
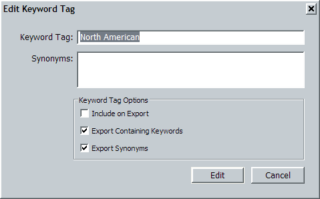 |
Now that we know the markup, we can quickly start to build large databases of keywords in our favorite text editor or even a spreadsheet program that can export tab-delimited text files. The following screen shots show the same keyword file opened in Excel and Notepad.
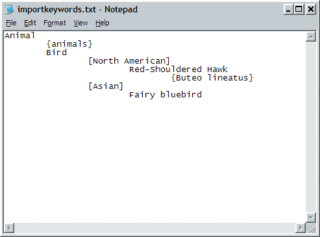 |
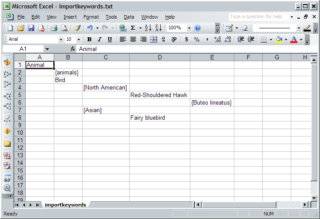 |
The final step is loading the keywords into Lightroom. This is done by clicking Import Keywords in the Metadata menu. Selecting Import Keywords will bring up a standard open file dialog box through which you navigate to the text file you saved your keywords as. When you’ve selected your keyword file in the dialog box, click open and Lightroom will begin processing the keyword file. After a few moments, the Keyword List panel will be populated with your new keywords.
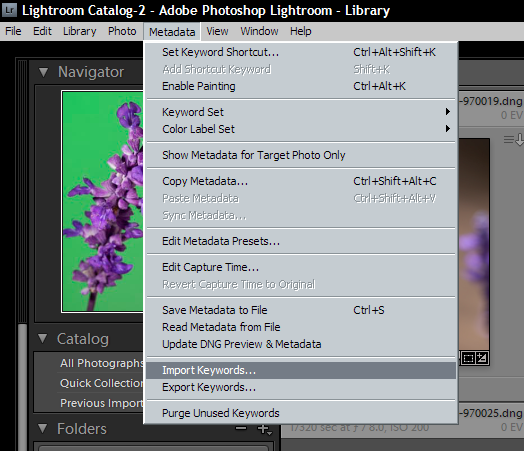
A couple of things to note, the import process will not remove keywords it only adds more. In addition, it doesn’t try to figure out where you want things blended. That is if you have a category “Bird” like in the example above, and you import another file of keywords that also has a Bird category but it’s not indented the same and under the same keywords, Lightroom won’t match them up. It will simply add another group of keyword to the keyword list.
If you already have a bunch of keywords and want to add a bunch more the safest way to do that using the import keyword method is to first use the Export Keywords menu command to create a file that matches your existing keyword list and edit that.
Advanced Uses of the Keywording Panel
The keywording panel isn’t nearly as limited as it seems, and is fully capable of creating hierarchies, synonyms, and non-exporting keywords as they’re entered. However, it’s not entirely ideal for very complex tasks.
Getting the most out of the keywording means remembering one more operator, the right angle-bracket or greater than symbol (>). Prior to Lightroom 5, this denoted that the keyword to the left is a child of the keyword to the right. For example, “lion > cat” would place the lion keyword inside the cat keyword as shown in the below.
- cat
- lion
- …
With Lightroom 5, Adobe has, for no apparent reason, decided to change the way the the parent/child (>) operator works. The new system is a little more flexible, as you can do it both ways, parent-then-child or child-then-parent, but they’ve reversed the ordering for the symbols so that the pointy end points towards the child keyword not the parent.
Lightroom 5 Note: They’ve reversed the ordering now, so that the pointy end points towards the child keyword not the parent.
That is, “child < parent” follows the old style of “child > parent” found in Lightrooms prior to 5.
Adding synonyms and non-exporting keywords, follows the same syntax as the imported files does. Surround the word in square brackets ([, and ]), and it won’t be exported. Surround the word in braces ({, and }) and the word will be treated as a synonym.
Lightroom isn’t entirely dumb about this, and will attempt to append your new keyword to an existing keyword if done does exist. So if cat, in the above example, already exists under animals, lion will be created as a child of that cat, as opposed to a new top level cat keyword being created.
Unfortunately, other than marking a parent keyword as non-exporting, using the keywording panel to create sophisticated hierarchies is considerably more difficult than the other methods. However, the child > parent syntax does come back in really sophisticated keywording hierarchies.
Advanced work with Hierarchies
One frustrating problem with reality is that there aren’t always unique words to describe everything and sometimes concepts overlap that may not make sense keywording wise. This becomes potentially problematic when keywording things with auto exporting hierarchies.
For example, the word salmon describes a fish, the resulting food made from that fish, as well as a color. Tagging something that is “salmon” the color with “salmon” from within an “animals” keyword hierarchy doesn’t make a lot of sense.
Fortunately, Lightroom doesn’t enforce uniqueness on keywords. It’s perfectly acceptable to have two or more lion keywords so long as they’re in different hierarchies. You could then imagine a situation where you had a hierarchy similar to the one shown below.
- Colors
- Salmon
- Plum
- Foods
- Salmon
- Plum
Figure 17: Example duplicating keyword hierarchy.
The two salmon keywords are treated distinctly. An image with the salmon under foods added would export with foods, and be counted in that group.
This doesn’t address all problems, for example searching though the keyword search box is still problematic as Adobe doesn’t recognize the two keywords separately there, you still have to supply some kind of secondary filter (say !colors) to get only the foods. However, bringing up images using the keyword filters (or by clicking the right arrow next to the keyword in the keyword list), will limit the search to just the images that match that keyword.
With a hierarchy like this, Lightroom needs to know which child to apply to an image. If you’re applying the keyword directly by clicking the checkbox in the Keyword List it knows that from the start, but that’s a cumbersome way of doing things. This is where the “child > parent” input mechanism comes back from the advanced Keywording Panel tips. You’ll need to use that syntax to specify which keyword to apply. Fortunately, Lightroom’s autocomplete detects these differences and you’ll see both options show up in the autocomplete field as you begin typing the keyword.
Keywording can range from very simplistic to near OCD obsessive levels, but what’s important to remember is that it’s there to serve you and help you find images faster. The key, in any event, is to find a system that makes sense to you not try and shoehorn yourself into someone else’s strategy.
Comments
Thank you for writing this article. I’m searching for a work-around to the fact LR won’t subtract keywords when editing and importing a txt file to amend a currently-existing keyword hierarchy. My main goal is to fix the abundance of keywords in my current list that won’t export with a photo (keywords in brackets). I want to remove the brackets in the txt document, then import the txt document. This would be much quicker than doing it in LR. So I’m not actually removing keywords, I’m just changing them. Is there any work-around to this shortcoming of LR?
Thank you for your time.
@Eric Zamroa,
I’ve thought on this for a while, and I can’t come up with any easy way to do what you want to do with out manipulating the LR catalog database directly–something I’m not at all comfortably with trying and something that’s complex enough to be an issue. Ultimately, I think this is yet another example of where part of Lightroom’s feature set is under developed, and I don’t know if Adobe has any real interest in developing it either.
By far the best explanation of Keywords that I have seen. Thank you much…
Al
Glad you found this useful.