Points in Focus Photography

Quick References

Filter by:

Cameras: Set White Balance with Live View

It’s possible to set an approximate, but fairly accurate, custom white balance using live view in liue of a custom white balance target. Though doing so will be be less accurate than a properly calibrated white balance card.

For most dual-dial Canon bodies, you cycle though the preset white balance modes using the rear dial, and change the kelvin value (or select from the multiple custom white balances on EOS-1D bodies) with the front dial when it’s that mode is selected.

Nikon cameras with live view support a similar adjustments again using the camera’s control dials.

For RAW shooters, setting up a custom white balance in the field can be useful when using filters that cause extreme color casts if there isn’t an obvious reference gray in the frame. Otherwise, the ability to adjust the white balance in post limits the utility of this technique.

Originally described by: DTown TV
Cameras

Canon Print Studio Pro Crashes on Start or Changing Paper Type

A condition exists in Canon’s Print Studio Pro printing software, where it will error and exit if the paper type is changed to a type that the computer doesn’t have an ICC profile for installed—say because you removed ICC profiles for paper’s you don’t use. This can result in an endless crash loop where Print Studio Pro crashes on start up and you cannot change the paper type to something that doesn’t cause the problem.

1) Do not clean up any unused Canon installed ICC profiles for your Pixma Pro printer. Doing so will likely trigger this problem and result in Print Studio Pro being unusable.

2) If you do trigger the error loop, you will need to install the missing ICC profiles, either by reinstalling the printer drivers or by extracting the necessary profiles from the printer driver installer and copying them manually to their appropreate color profile store on your computer.

  • Windows: C:\windows\system32\spool\drivers\color\ in Windows
  • Mac OS: /username/Library/ColorSync/Profiles or /Library/ColorSync/Profiles

3) If you wish not to restore the ICC profiles, you can clear the settings for Print Studio Pro by deleting the files stored in:

  • Windows: C:\users\user_name\AppData\Roaming\Canon\Print Studio Pro\
  • Mac OS: ? currently known by me
Printing

Lenses: Magnifications

There are two ways the magnification of the lens is generally described.

  • The ratio form gives the ratio of image size to object size. In other words, if a lens has a maximum magnification of 1:4, then at that magnification the object will be 4 times larger than the image.
  • The decimal form is simply the decimal representation of that ratio. For example, a 1:4 magnification can also be expressed as 0.25x.

To convert from the ratio form to the decimal form, divide the object size by the image size.

Some Common Magnifications

  • 5:1 (5x) – The highest magnification of the Canon MP-E 65mm f/2.8
  • 1:1 (1x) – True macro magnification, the image is the same size as the subject was. Most true macro lens support this magnification.
  • 1:2 (0.5x) – Half macro magnification, the Canon EF 50mm f/2.5 compact macro and the Zeiss Macro Planar lenses reach this.
  • 1:4 (0.25x) – “Consumer Macro”, most lenses that aren’t dedicated macro lenses but are branded as macro reach this magnification.
Lenses

Lightroom: Develop Setting Sortcuts from Library

For: Lightroom 4+

Here are a couple of handy shortcuts for altering an image’s develop settings from the Library Module (as well as the Develop Module).

Shortcut Keystroke (Win) Keystroke (Mac)
Reset Image Ctrl + Shift + R Cmd + Shift + R
Convert to Black and White V V
Match Tonal Exposures Ctrl + Alt + Shift + M Cmd + Option + Shift + M
Copy Develop Settings Ctrl + Shift + C Cmd + Shift + C
Paste Develop Settings Ctrl + Shift + V Cmd + Shift + V
Sync Settings Ctrl + Shift + S Cmd + Shift + S
Lightroom

Lightroom: Expanding and Collapsing all Subitems

In Adobe Photoshop Lightroom there are many places where you might want to expand or collapse multiple items all at once; the Folders list, Collections list, or keywords list for example.

If you hold the alt-key (option on Mac OS) and click the triangle next to the entry to expand or collapse it, it will expand or collapse that entry and any sub entries that can also be expand or collapsed.

Taking it a step further alt-clicking (option-clicking) on the panels themselves will switch them into solo mode, where only the active panel will be expanded, and everything else will just be a title. You can tell if the panels are in solo mode because their open/close arrows go from being solid to being dotted.

One final tip, control-clicking (command-clicking on a mac) a panel title will expand or collapse all panels on that side of the screen.

Lightroom

Lightroom: Graphic Watermark Checklist

For: Lightroom 3+

  • Create your watermark image in Photoshop or another graphic editor
    • Make sure it’s big enough that it won’t need to be scaled up
    • Make sure the background is transparent
    • Simplify any color schemes
    • Make sure your text has a contrasting border
    • Save your watermark image as a 24-bit PNG (PNG-24) with transparency
  • Create a Watermark to apply to your images on export in Lightroom
    • Open the Watermark Editor (Edit -> Edit Watermarks…)
    • In the top right corner where it says Watermark Style, pick “Graphic”
    • In the Open File dialog that pops up, navigate to where you saved your watermark image from your image editor
    • Adjust the opacity, proportion, inset, and anchor point under Watermark Effects to position the watermark where you want it
    • Save your watermark by clicking the save button in the lower right corner of the Watermark Editor window
      • If there is no save button, or you’re updating an existing watermark, use the Save Current Settings as New Preset or Update Preset… options from the drop-down menu in the top left corner of the Watermark Editor.
  • Close the Watermark Editor window, and begin using your watermark when you export images


Lightroom

Lightroom: Leveling the Horizon

When in crop mode (shortcut key R) you can quickly use the Straighten tool by holding the CTRL key (Command on a Mac).

Lightroom

Lightroom: My Metadata Field List

I never found the the built in options in Lightroom’s metadata pallet to suit my needs. They either were too short and didn’t have the stuff I wanted, or too long and I had to scroll a lot. Fortunately, Adobe lets you create custom metadata field lists so you can have it your way.

This is what I use, in fact I almost never change away from it. It’s designed such that on my 1920×1600 screen I can see at a glance all the information I want about file size, exposure, lens, camera settings, as well as be able to edit the title, headline, and caption fields without having to scroll and while the Histogram and Keywording panels are expanded.

Extract CombinedImage.zip and copy the file CombinedImage.lrtemplate to %appdata%\Adobe\Lightroom\Metadata Filed Lists/ on Windows or ~/Library/Adobe/Lightroom/Metadata Field Lists/ on Mac OS.

If the Metadata Field Lists folder doesn’t exist, as is the case with newer Lightroom installs (starting with version 3 or 4) then you’ll need to create it.

The file and instructions are provided as is and without warranty or support. Feel free to modify and redistribute the provided lrtemplate file.

Lightroom

Lightroom: Rate and Advance to the Next Image

In Lightroom 3 you can rate, flag, or label an image and advance to the next image automatically without having the “Auto Advance” mode enabled by holding the SHIFT key when you press the shortcut for the action you want to take.

For example, to reject an image you can hit X, to reject and advance you hit SHIFT+X.

This works with all the keys on the main keyboard but not the numpad.

Lightroom

Neutral Density Filter Factors Table

A table of ND filter strength in stops, decimal density (i.e. 0.3), and Hoya’s x-factor/Cokin’s ND#.

Stops Decimal Factor (B+W, Formatt/Hitech, Lee, ) ND#/#x Factor (Cokin, Hoya)
1 0.3 2
1.5 0.45
2 0.6 4
2.5 0.75
3 0.9 8
4 1.2 16
6 1.8 64
9 400
10 3.0 1,000
13 4.0 10,000
20 6.0 1,000,000
Filters

Premiere Pro CS6: Transcribing Videos

For: Premiere Pro CS5.5+

To transcribe a video’s audio in Premiere Pro CS6 do the following:

  1. Select the media you wish to transcribe in the Project panel
  2. Goto the metadata panel (Window Menu → Metadata)
  3. Expand the last section labeled Speech Analysis
  4. Click the Analyze button
Premiere Pro

Premiere Pro: How to hide the adjustment line shown on clips in the timeline?

For: Premier Pro CS6+

Sometimes when working in premiere it’s desirable to remove/hide the key frames and associated features from the editing timeline without collapsing the channel so you don’t lose the frame thumbnails.

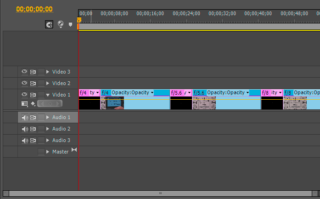
Basically, change this:

timeline-w-keyframes

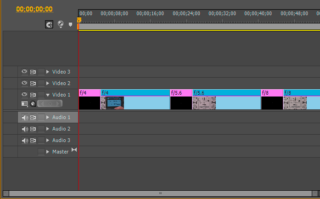
Into this:

timeline-wo-keyframes

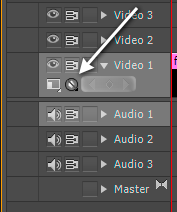
To do that, click the icon indicated by the arrow in the following image and select “Hide Keyframes” form the menu that pops up.

keyframe-control


Premiere Pro
Our cookie and privacy policy. Dismiss